Pathfinding
16pts
Python
Java
C++
Algorithms
Data
Pathfinding algorithms breadth-first search and depth-first search
A brief review of graphs: A graph is a collection of
nodes (the circles) connected by edges (the lines).
Traversing a graph means traveling along these edges to visit
other nodes.
How can we use graphs to solve problems? One such problem is
searching for a node in a graph. For example, you could treat every
cell in a maze as a node and connected cells as if there is an edge
connecting those two nodes. The task of navigating the maze then
boils down to: starting from a given node (the start of the maze) in
a given graph (the maze), find the target node (the end of the
maze).
Breadth-first search and depth-first search (BFS and
DFS) are two different methods to accomplishing the task of finding
a specific node in a graph. While both algorithms have the same goal
— searching for a node — the main difference between these two
methods is in how they search; while BFS prioritizes closer nodes
(breadth), DFS will go as deep as possible into the graph first
(depth).
Here is a visualization of BFS:
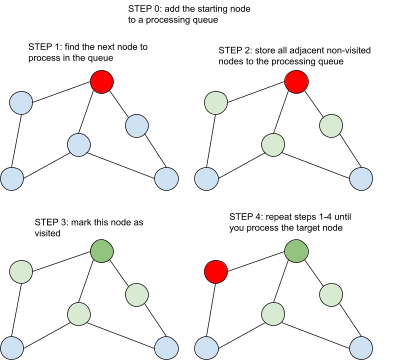
In short, the strategy is to start with a node, mark down all
adjacent nodes, then process the queued nodes one by one in the
order that they were added to the queue. In the end, every node that
could be reached from the starting node is processed, meaning as
long as the node you are searching for is connected, you will find
it.
Here’s what the implementation of BFS for the diagram above looks
like. In this example, we use a 2D array to represent the edges; a
True
at
edges[i][j]
denotes that node
i
and node
j
have an edge connecting them.
Code:
# set up nodes and edges
edges = [[False]*7 for i in range(7)]
edges[1][2] = True
edges[1][4] = True
edges[1][5] = True
edges[2][3] = True
edges[3][4] = True
edges[4][6] = True
edges[5][6] = True

# this tells the computer if we've visited this node before so we don't process it again
visited = [False] * 7

# target can be any node you want
target_node = 3

# set up our processing queue
queue = [1]

while len(queue) > 0:
    # get the next node in the queue and remove it from the queue
    current_node = queue[0]
    queue.pop(0)

    # if we've visited the node, we can skip it
    if visited[current_node]:
        continue

    print("Currently on node " + str(current_node))

    # identify when we've found the target node
    if current_node == target_node:
        print("Found target node!")

    # traverse the graph
    for i in range(7):
        if edges[current_node][i]:
            queue.append(i)

    # print the current queue
    print("Current queue: " + str(queue))
    print()

    # mark our current node as visited
    visited[current_node] = True
> Currently on node 1
> Current queue: [2, 4, 5]
>
> Currently on node 2
> Current queue: [4, 5, 3]
>
> Currently on node 4
> Current queue: [5, 3, 6]
>
> Currently on node 5
> Current queue: [3, 6, 6]
>
> Currently on node 3
> Found target node!
> Current queue: [6, 6, 4]
>
> Currently on node 6
> Current queue: [6, 4]
> Current queue: [2, 4, 5]
>
> Currently on node 2
> Current queue: [4, 5, 3]
>
> Currently on node 4
> Current queue: [5, 3, 6]
>
> Currently on node 5
> Current queue: [3, 6, 6]
>
> Currently on node 3
> Found target node!
> Current queue: [6, 6, 4]
>
> Currently on node 6
> Current queue: [6, 4]
Code:
import java.util.*;
public class BFS {
    public static void main(String[] args){
        // set up nodes and edges
        boolean[][] edges = {{false, false, false, false, false, false, false}, {false, false, true, false, true, true, false}, {false, false, false, true, false, false, false}, {false, false, false, false, true, false, false}, {false, false, false, false, false, false, true}, {false, false, false, false, false, false, true}, {false, false, false, false, false, false, false}};

        // this tells the computer if we've visited this node before so we don't process it again
        boolean[] visited = new boolean[7];

        // target can be any node you want
        int target_node = 3;

        // set up our processing queue
        LinkedList<Integer> queue = new LinkedList<Integer>();
        queue.add(1);

        while(!queue.isEmpty()) {
            // get the next node in the queue and remove it from the queue
            int current_node = queue.remove();

            // if we've visited the node, we can skip it
            if(visited[current_node]) {
                continue;
            }

            System.out.println("Currently on node " + current_node);

            // identify when we've found the target node
            if(current_node == target_node) {
                System.out.println("Found target node!");
            }

            // traverse the graph
            for(int i = 0; i < 7; i++) {
                if(edges[current_node][i]) {
                    queue.add(i);
                }
            }

            // print the current queue
            System.out.print("Current queue: ");
            for(int x : queue) {
                System.out.print(x + " ");
            }
            System.out.println();
            System.out.println();

            // mark our current node as visited
            visited[current_node] = true;
        }
    }
}
> Currently on node 1
> Current queue: 2 4 5
>
> Currently on node 2
> Current queue: 4 5 3
>
> Currently on node 4
> Current queue: 5 3 6
>
> Currently on node 5
> Current queue: 3 6 6
>
> Currently on node 3
> Found target node!
> Current queue: 6 6 4
>
> Currently on node 6
> Current queue: 6 4
> Current queue: 2 4 5
>
> Currently on node 2
> Current queue: 4 5 3
>
> Currently on node 4
> Current queue: 5 3 6
>
> Currently on node 5
> Current queue: 3 6 6
>
> Currently on node 3
> Found target node!
> Current queue: 6 6 4
>
> Currently on node 6
> Current queue: 6 4
Code:
#include <bits/stdc++.h>

using namespace std;

// set up nodes and edges
bool edges[7][7] = {{false, false, false, false, false, false, false}, {false, false, true, false, true, true, false}, {false, false, false, true, false, false, false}, {false, false, false, false, true, false, false}, {false, false, false, false, false, false, true}, {false, false, false, false, false, false, true}, {false, false, false, false, false, false, false}};

// this tells the computer if we've visited this node before so we don't process it again
bool visited[7] = {};

// target can be any node you want
int target_node = 3;

// this function prints the queue
void print_queue(queue<int> q) {
  while (!q.empty())
  {
    cout << q.front() << " ";
    q.pop();
  }
}

int main() {
    // set up our processing queue
    queue<int> q;
    q.push(1);

    while(!q.empty()) {
        // get the next node in the queue and remove it from the queue
        int current_node = q.front();
        q.pop();

        // if we've visited the node, we can skip it
        if(visited[current_node]) {
            continue;
        }

        cout << "Currently on node " << current_node << "\n";

        // identify when we've found the target node
        if(current_node == target_node) {
            cout << "Found target node!\n";
        }

        // traverse the graph
        for(int i = 0; i < 7; i++) {
            if(edges[current_node][i]) {
                q.push(i);
            }
        }

        // print the current queue
        cout << "Current queue: ";
        print_queue(q);
        cout << "\n\n";

        // mark our current node as visited
        visited[current_node] = true;
    }

    return 0;
}
> Currently on node 1
> Current queue: 2 4 5
>
> Currently on node 2
> Current queue: 4 5 3
>
> Currently on node 4
> Current queue: 5 3 6
>
> Currently on node 5
> Current queue: 3 6 6
>
> Currently on node 3
> Found target node!
> Current queue: 6 6 4
>
> Currently on node 6
> Current queue: 6 4
> Current queue: 2 4 5
>
> Currently on node 2
> Current queue: 4 5 3
>
> Currently on node 4
> Current queue: 5 3 6
>
> Currently on node 5
> Current queue: 3 6 6
>
> Currently on node 3
> Found target node!
> Current queue: 6 6 4
>
> Currently on node 6
> Current queue: 6 4
You can play with the BFS code on Replit:
Depth-first search
How does BFS compare to DFS?
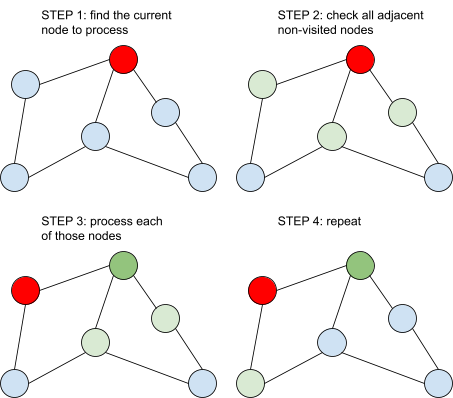
As seen in the diagram above, DFS does not wait for a node to check
its neighbors first. It immediately begins processing the first
neighbor it finds, waiting until that node is fully processed before
checking any other neighbors. Consequently, nodes that further away
have a chance to be visited much faster.
Here’s what the implementation of DFS looks like. It uses the same
method to store nodes and edges as the BFS implementation.
Code:
# set up nodes and edges
edges = [[False]*7 for i in range(7)]
edges[1][2] = True
edges[1][4] = True
edges[1][5] = True
edges[2][3] = True
edges[3][4] = True
edges[4][6] = True
edges[5][6] = True

# this tells the computer if we've visited this node before so we don't process it again
visited = [False] * 7

# target can be any node you want
target_node = 3

def dfs(current_node):
    # if we've visited the node, we can skip it
    if visited[current_node]:
        return

    # mark our current node as visited
    visited[current_node] = True

    print("Currently on node " + str(current_node))

    # identify when we've found the target node
    if current_node == target_node:
        print("Found target node!")

    # traverse the graph
    for i in range(7):
        if edges[current_node][i]:
            dfs(i)

# call the function
dfs(1)
> Currently on node 1
> Currently on node 2
> Currently on node 3
> Found target node!
> Currently on node 4
> Currently on node 6
> Currently on node 5
> Currently on node 2
> Currently on node 3
> Found target node!
> Currently on node 4
> Currently on node 6
> Currently on node 5
Code:
import java.util.*;
public class DFS {
    public static void main(String[] args){
        // set up nodes and edges
        boolean[][] edges = {{false, false, false, false, false, false, false}, {false, false, true, false, true, true, false}, {false, false, false, true, false, false, false}, {false, false, false, false, true, false, false}, {false, false, false, false, false, false, true}, {false, false, false, false, false, false, true}, {false, false, false, false, false, false, false}};

        // this tells the computer if we've visited this node before so we don't process it again
        boolean[] visited = new boolean[7];

        // target can be any node you want
        int target_node = 3;

        dfs(1, edges, visited, target_node);
    }

    static void dfs(int current_node, boolean[][] edges, boolean[] visited, int target_node) {
        // if we've visited the node, we can skip it
        if(visited[current_node]) {
            return;
        }

        // mark our current node as visited
        visited[current_node] = true;

        System.out.println("Currently on node " + current_node);

        // identify when we've found the target node
        if(current_node == target_node) {
            System.out.println("Found target node!");
        }

        // traverse the graph
        for(int i = 0; i < 7; i++) {
            if(edges[current_node][i]) {
                dfs(i, edges, visited, target_node);
            }
        }
    }
}
> Currently on node 1
> Currently on node 2
> Currently on node 3
> Found target node!
> Currently on node 4
> Currently on node 6
> Currently on node 5
> Currently on node 2
> Currently on node 3
> Found target node!
> Currently on node 4
> Currently on node 6
> Currently on node 5
Code:
#include <bits/stdc++.h>

using namespace std;

// set up nodes and edges
bool edges[7][7] = {{false, false, false, false, false, false, false}, {false, false, true, false, true, true, false}, {false, false, false, true, false, false, false}, {false, false, false, false, true, false, false}, {false, false, false, false, false, false, true}, {false, false, false, false, false, false, true}, {false, false, false, false, false, false, false}};

// this tells the computer if we've visited this node before so we don't process it again
bool visited[7] = {};

// target can be any node you want
int target_node = 3;

void dfs(int current_node) {
    // if we've visited the node, we can skip it
    if(visited[current_node]) {
        return;
    }

    // mark our current node as visited
    visited[current_node] = true;

    cout << "Currently on node " << current_node << "\n";

    // identify when we've found the target node
    if(current_node == target_node) {
        cout << "Found target node!\n";
    }

    // traverse the graph
    for(int i = 0; i < 7; i++) {
        if(edges[current_node][i]) {
            dfs(i);
        }
    }
}

int main() {
    dfs(1);

    return 0;
}
> Currently on node 1
> Currently on node 2
> Currently on node 3
> Found target node!
> Currently on node 4
> Currently on node 6
> Currently on node 5
> Currently on node 2
> Currently on node 3
> Found target node!
> Currently on node 4
> Currently on node 6
> Currently on node 5
Note: Both the BFS and DFS implementations are extremely inefficient
(and non-scalable) ways of storing edges/nodes and traversing the
graph, only used for demonstration purposes. Please Google more
efficient implementations if you plan on using BFS or DFS.
When deciding between BFS vs. DFS, you need to consider where your
target node is probably located. If it’s far away from the starting
node (like in most mazes), DFS has a slight chance to find it early
because it fully traverses every pathway before returning to the
start. However, BFS is guaranteed to find it after processing most
of the other nodes since it searches every node close to the
starting node before moving on. In this case, DFS is the better
choice. Conversely, if a node is located close to the starting node,
BFS is guaranteed to find it very quickly, whereas DFS will keep
searching very far away and only has a slight chance of finding the
node as promptly as BFS. In this case, BFS is the better choice.
You can play with the DFS code on Replit:
Flood Fill
Ever wonder how the paint bucket tool works? When you go into
something like MS Paint, if you ever want to fill up a specific
area, all you have to do is click a color, the paint bucket, and one
specific pixel in the region you want to fill. Then, as if by magic,
the area is filled. But why? Or more specifically, how exactly does
the code work?
First, to simplify this problem, imagine that the area you need to
fill is composed entirely of individual pixels (just like in MS
Paint!). This changes the problem from filling a rough blob to an
area with strict horizontal and vertical borders.
Now, this is where the flood fill technique comes in. Flood
fill starts from a point and “spills” outward until it hits a wall.
To illustrate this algorithm, take a look at this grid (note that it
follows the definition above):
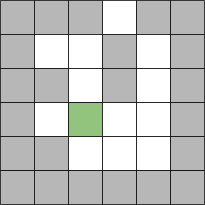
Here, gray squares denote the borders that block the spread of the
flood fill, and white squares are open squares that can be filled.
Now, how will the flood fill algorithm fill the space from here?
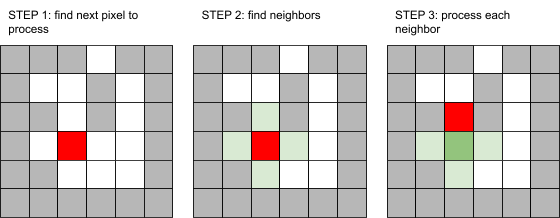
As seen here, the algorithm will first find a pixel to process and
fill in (red). Then, it stores any adjacent, open pixels that have
not yet been processed (light green). Once the original pixel
finishes processing, it is removed from storage and marked as
visited so it isn’t processed again (dark green). After, the
algorithm will pick a stored pixel (light green) to process. Can you
see how every pixel reachable from the start pixel will be
eventually colored in?
Note: Flood fill can be implemented by adapting either
Breadth-First-Search or Depth-First-Search for grids.
Here’s what the code for flood fill for the above example looks
like:
Code:
grid = [[False, False, False, True, False, False],[False, True, True, False, True, False],[False, False, True, False, True, False],[False, True, True, True, True, False],[False, False, True, True, True, False],[False, False, False, False, False, False]]

starting_point = [3,2]

def print_grid(your_grid):
    for row in your_grid:
        str = ""
        for box in row:
            if box:
                str += "O"
            else:
                str += "X"
        print(str)

def flood_fill(current_point):
    if not grid[current_point[0]][current_point[1]]:
        return

    grid[current_point[0]][current_point[1]] = False

    directions = [[1,0],[-1,0],[0,1],[0,-1]]
    for direction in directions:
        adjacent_point = [current_point[0]+direction[0],current_point[1]+direction[1]]
        if adjacent_point[0] < 0 or adjacent_point[0] > 5 or adjacent_point[1] < 0 or adjacent_point[1] > 5:
            continue
        flood_fill(adjacent_point)

print("Original grid:")
print_grid(grid)
flood_fill(starting_point)
print("Flood filled grid:")
print_grid(grid)
> Original grid:
> XXXOXX
> XOOXOX
> XXOXOX
> XOOOOX
> XXOOOX
> XXXXXX
> Flood filled grid:
> XXXOXX
> XXXXXX
> XXXXXX
> XXXXXX
> XXXXXX
> XXXXXX
> XXXOXX
> XOOXOX
> XXOXOX
> XOOOOX
> XXOOOX
> XXXXXX
> Flood filled grid:
> XXXOXX
> XXXXXX
> XXXXXX
> XXXXXX
> XXXXXX
> XXXXXX
Code:
import java.util.*;
public class floodFill {
    static boolean[][] grid = {{false, false, false, true, false, false},{false, true, true, false, true, false},{false, false, true, false, true, false},{false, true, true, true, true, false},{false, false, true, true, true, false},{false, false, false, false, false, false}};

    public static void main(String[] args) {
        int[] starting_point = {3,2};
        System.out.println("Original grid:");
        print_grid(grid);
        flood_fill(starting_point);
        System.out.println("Flood filled grid:");
        print_grid(grid);
    }

    static void print_grid(boolean[][] your_grid) {
        for(boolean[] row : your_grid) {
            String s = "";
            for(boolean b : row) {
                if(b) s += "O";
                else s += "X";
            }
            System.out.println(s);
        }
    }

    static void flood_fill(int[] current_point) {
        if(!grid[current_point[0]][current_point[1]]) return;

        grid[current_point[0]][current_point[1]] = false;

        int[][] directions = {{1,0},{-1,0},{0,1},{0,-1}};
        for(int[] direction : directions) {
            int[] adjacent_point = {current_point[0]+direction[0],current_point[1]+direction[1]};
            if(adjacent_point[0] < 0 || adjacent_point[0] > 5 || adjacent_point[1] < 0 || adjacent_point[1] > 5) continue;
            flood_fill(adjacent_point);
        }
    }
}
> Original grid:
> XXXOXX
> XOOXOX
> XXOXOX
> XOOOOX
> XXOOOX
> XXXXXX
> Flood filled grid:
> XXXOXX
> XXXXXX
> XXXXXX
> XXXXXX
> XXXXXX
> XXXXXX
> XXXOXX
> XOOXOX
> XXOXOX
> XOOOOX
> XXOOOX
> XXXXXX
> Flood filled grid:
> XXXOXX
> XXXXXX
> XXXXXX
> XXXXXX
> XXXXXX
> XXXXXX
Code:
#include <bits/stdc++.h>

using namespace std;

bool grid[6][6] = {{false, false, false, true, false, false},{false, true, true, false, true, false},{false, false, true, false, true, false},{false, true, true, true, true, false},{false, false, true, true, true, false},{false, false, false, false, false, false}};

void print_grid() {
    for(auto& row : grid) {
        for(auto& b : row) {
            if(b) cout << "O";
            else cout << "X";
        } cout << "\n";
    }
}

void flood_fill(int current_point[]) {
    if(!grid[current_point[0]][current_point[1]]) return;

    grid[current_point[0]][current_point[1]] = false;

    int directions[4][2] = {{1,0},{-1,0},{0,1},{0,-1}};
    for(auto& direction : directions) {
        int adjacent_point[2] = {current_point[0]+direction[0],current_point[1]+direction[1]};
        if(adjacent_point[0] < 0 || adjacent_point[0] > 5 || adjacent_point[1] < 0 || adjacent_point[1] > 5) continue;
        flood_fill(adjacent_point);
    }
}

int main() {
    int starting_point[2] = {3,2};
    cout << "Original grid:\n";
    print_grid();
    flood_fill(starting_point);
    cout << "Flood filled grid:\n";
    print_grid();
    return 0;
}
> Original grid:
> XXXOXX
> XOOXOX
> XXOXOX
> XOOOOX
> XXOOOX
> XXXXXX
> Flood filled grid:
> XXXOXX
> XXXXXX
> XXXXXX
> XXXXXX
> XXXXXX
> XXXXXX
> XXXOXX
> XOOXOX
> XXOXOX
> XOOOOX
> XXOOOX
> XXXXXX
> Flood filled grid:
> XXXOXX
> XXXXXX
> XXXXXX
> XXXXXX
> XXXXXX
> XXXXXX
Flood fill has the very obvious real-world application of filling an
area in graphics applications. However, it can also help with
searching a bounded area. There are plenty of other, more efficient
methods to perform a flood fill; the one we’ve shown is the easiest
to understand and we encourage everyone to Google flood fill
algorithms for more advanced versions!
You can play with all the code we've used in this article on Replit: