Flood Fill
13pts
Python
Java
C++
Algorithms
How to code a paint bucket tool with the flood fill technique
Ever wonder how the paint bucket tool works? When you go into
something like MS Paint, if you ever want to fill up a specific
area, all you have to do is click a color, the paint bucket, and one
specific pixel in the region you want to fill. Then, as if by magic,
the area is filled. But why? Or more specifically, how exactly does
the code work?
First, to simplify this problem, imagine that the area you need to
fill is composed entirely of individual pixels (just like in MS
Paint!). This changes the problem from filling a rough blob to an
area with strict horizontal and vertical borders.
Now, this is where the flood fill technique comes in. Flood
fill starts from a point and “spills” outward until it hits a wall.
To illustrate this algorithm, take a look at this grid (note that it
follows the definition above):
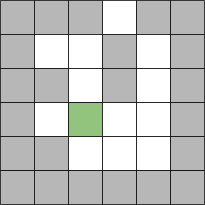
Here, gray squares denote the borders that block the spread of the
flood fill, and white squares are open squares that can be filled.
Now, how will the flood fill algorithm fill the space from here?
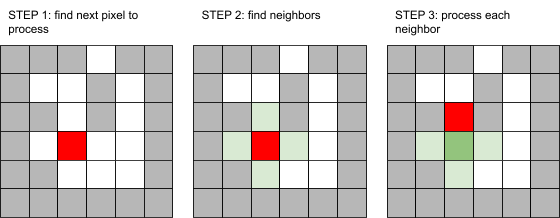
As seen here, the algorithm will first find a pixel to process and
fill in (red). Then, it stores any adjacent, open pixels that have
not yet been processed (light green). Once the original pixel
finishes processing, it is removed from storage and marked as
visited so it isn’t processed again (dark green). After, the
algorithm will pick a stored pixel (light green) to process. Can you
see how every pixel reachable from the start pixel will be
eventually colored in?
Note: Flood fill can be implemented by adapting either
Breadth-First-Search or Depth-First-Search for grids.
Here’s what the code for flood fill for the above example looks
like:
Code:
grid = [[False, False, False, True, False, False],[False, True, True, False, True, False],[False, False, True, False, True, False],[False, True, True, True, True, False],[False, False, True, True, True, False],[False, False, False, False, False, False]]

starting_point = [3,2]

def print_grid(your_grid):
    for row in your_grid:
        str = ""
        for box in row:
            if box:
                str += "O"
            else:
                str += "X"
        print(str)

def flood_fill(current_point):
    if not grid[current_point[0]][current_point[1]]:
        return

    grid[current_point[0]][current_point[1]] = False

    directions = [[1,0],[-1,0],[0,1],[0,-1]]
    for direction in directions:
        adjacent_point = [current_point[0]+direction[0],current_point[1]+direction[1]]
        if adjacent_point[0] < 0 or adjacent_point[0] > 5 or adjacent_point[1] < 0 or adjacent_point[1] > 5:
            continue
        flood_fill(adjacent_point)

print("Original grid:")
print_grid(grid)
flood_fill(starting_point)
print("Flood filled grid:")
print_grid(grid)
> Original grid:
> XXXOXX
> XOOXOX
> XXOXOX
> XOOOOX
> XXOOOX
> XXXXXX
> Flood filled grid:
> XXXOXX
> XXXXXX
> XXXXXX
> XXXXXX
> XXXXXX
> XXXXXX
> XXXOXX
> XOOXOX
> XXOXOX
> XOOOOX
> XXOOOX
> XXXXXX
> Flood filled grid:
> XXXOXX
> XXXXXX
> XXXXXX
> XXXXXX
> XXXXXX
> XXXXXX
Code:
import java.util.*;
public class floodFill {
    static boolean[][] grid = {{false, false, false, true, false, false},{false, true, true, false, true, false},{false, false, true, false, true, false},{false, true, true, true, true, false},{false, false, true, true, true, false},{false, false, false, false, false, false}};

    public static void main(String[] args) {
        int[] starting_point = {3,2};
        System.out.println("Original grid:");
        print_grid(grid);
        flood_fill(starting_point);
        System.out.println("Flood filled grid:");
        print_grid(grid);
    }

    static void print_grid(boolean[][] your_grid) {
        for(boolean[] row : your_grid) {
            String s = "";
            for(boolean b : row) {
                if(b) s += "O";
                else s += "X";
            }
            System.out.println(s);
        }
    }

    static void flood_fill(int[] current_point) {
        if(!grid[current_point[0]][current_point[1]]) return;

        grid[current_point[0]][current_point[1]] = false;

        int[][] directions = {{1,0},{-1,0},{0,1},{0,-1}};
        for(int[] direction : directions) {
            int[] adjacent_point = {current_point[0]+direction[0],current_point[1]+direction[1]};
            if(adjacent_point[0] < 0 || adjacent_point[0] > 5 || adjacent_point[1] < 0 || adjacent_point[1] > 5) continue;
            flood_fill(adjacent_point);
        }
    }
}
> Original grid:
> XXXOXX
> XOOXOX
> XXOXOX
> XOOOOX
> XXOOOX
> XXXXXX
> Flood filled grid:
> XXXOXX
> XXXXXX
> XXXXXX
> XXXXXX
> XXXXXX
> XXXXXX
> XXXOXX
> XOOXOX
> XXOXOX
> XOOOOX
> XXOOOX
> XXXXXX
> Flood filled grid:
> XXXOXX
> XXXXXX
> XXXXXX
> XXXXXX
> XXXXXX
> XXXXXX
Code:
#include <bits/stdc++.h>

using namespace std;

bool grid[6][6] = {{false, false, false, true, false, false},{false, true, true, false, true, false},{false, false, true, false, true, false},{false, true, true, true, true, false},{false, false, true, true, true, false},{false, false, false, false, false, false}};

void print_grid() {
    for(auto& row : grid) {
        for(auto& b : row) {
            if(b) cout << "O";
            else cout << "X";
        } cout << "\n";
    }
}

void flood_fill(int current_point[]) {
    if(!grid[current_point[0]][current_point[1]]) return;

    grid[current_point[0]][current_point[1]] = false;

    int directions[4][2] = {{1,0},{-1,0},{0,1},{0,-1}};
    for(auto& direction : directions) {
        int adjacent_point[2] = {current_point[0]+direction[0],current_point[1]+direction[1]};
        if(adjacent_point[0] < 0 || adjacent_point[0] > 5 || adjacent_point[1] < 0 || adjacent_point[1] > 5) continue;
        flood_fill(adjacent_point);
    }
}

int main() {
    int starting_point[2] = {3,2};
    cout << "Original grid:\n";
    print_grid();
    flood_fill(starting_point);
    cout << "Flood filled grid:\n";
    print_grid();
    return 0;
}
> Original grid:
> XXXOXX
> XOOXOX
> XXOXOX
> XOOOOX
> XXOOOX
> XXXXXX
> Flood filled grid:
> XXXOXX
> XXXXXX
> XXXXXX
> XXXXXX
> XXXXXX
> XXXXXX
> XXXOXX
> XOOXOX
> XXOXOX
> XOOOOX
> XXOOOX
> XXXXXX
> Flood filled grid:
> XXXOXX
> XXXXXX
> XXXXXX
> XXXXXX
> XXXXXX
> XXXXXX
Flood fill has the very obvious real-world application of filling an
area in graphics applications. However, it can also help with
searching a bounded area. There are plenty of other, more efficient
methods to perform a flood fill; the one we’ve shown is the easiest
to understand and we encourage everyone to Google flood fill
algorithms for more advanced versions!
You can play with all the code we've used in this article on Replit: